Showing posts with label Dessert. Show all posts

Friday, April 29, 2016

Chocolate Lava Cake Served With Creme Anglaise & Strawberry


We eat with our eyes first, prettily presenting your desserts that makes for a pleasing visual feast. You can make very delicious and lovely desserts with chocolate can add texture, smell, color and flavor to any dessert. This chocolate cake that makes perfect fair for strawberries with cream vanilla custard.
Ingredients:
200g semi-sweet chocolate chips
75g refine white sugar
50g plain flour
3 whole eggs
1 egg white
2 tbsp bourbon or brandy
1 tbsp vanilla extract
1 orange zest
100g unsalted butter plus for rubbing the tins
100% unsweetened cacao powder for dusting the tins
6 muffin tins 0r ramekins
Creme Anglaise
Preparation:
1. Preheat oven in 200°C. Using 1 or 2 tbsp of melted butter, grease muffin tins, then dusted with cacao powder, set aside. 
2. Place the chocolate chips and butter in mixing bowl. Add a small amount of water in the bottom of the pan. The water should not touch the pan. Place the chips and butter in the top pan and start heating. Stir frequently until is just melted. Remove from the heat and let cool for 10 minutes.
3. Add the sugar and a pinch of salt and whisk.  Then add the eggs at a time then stir until lightly foamy.
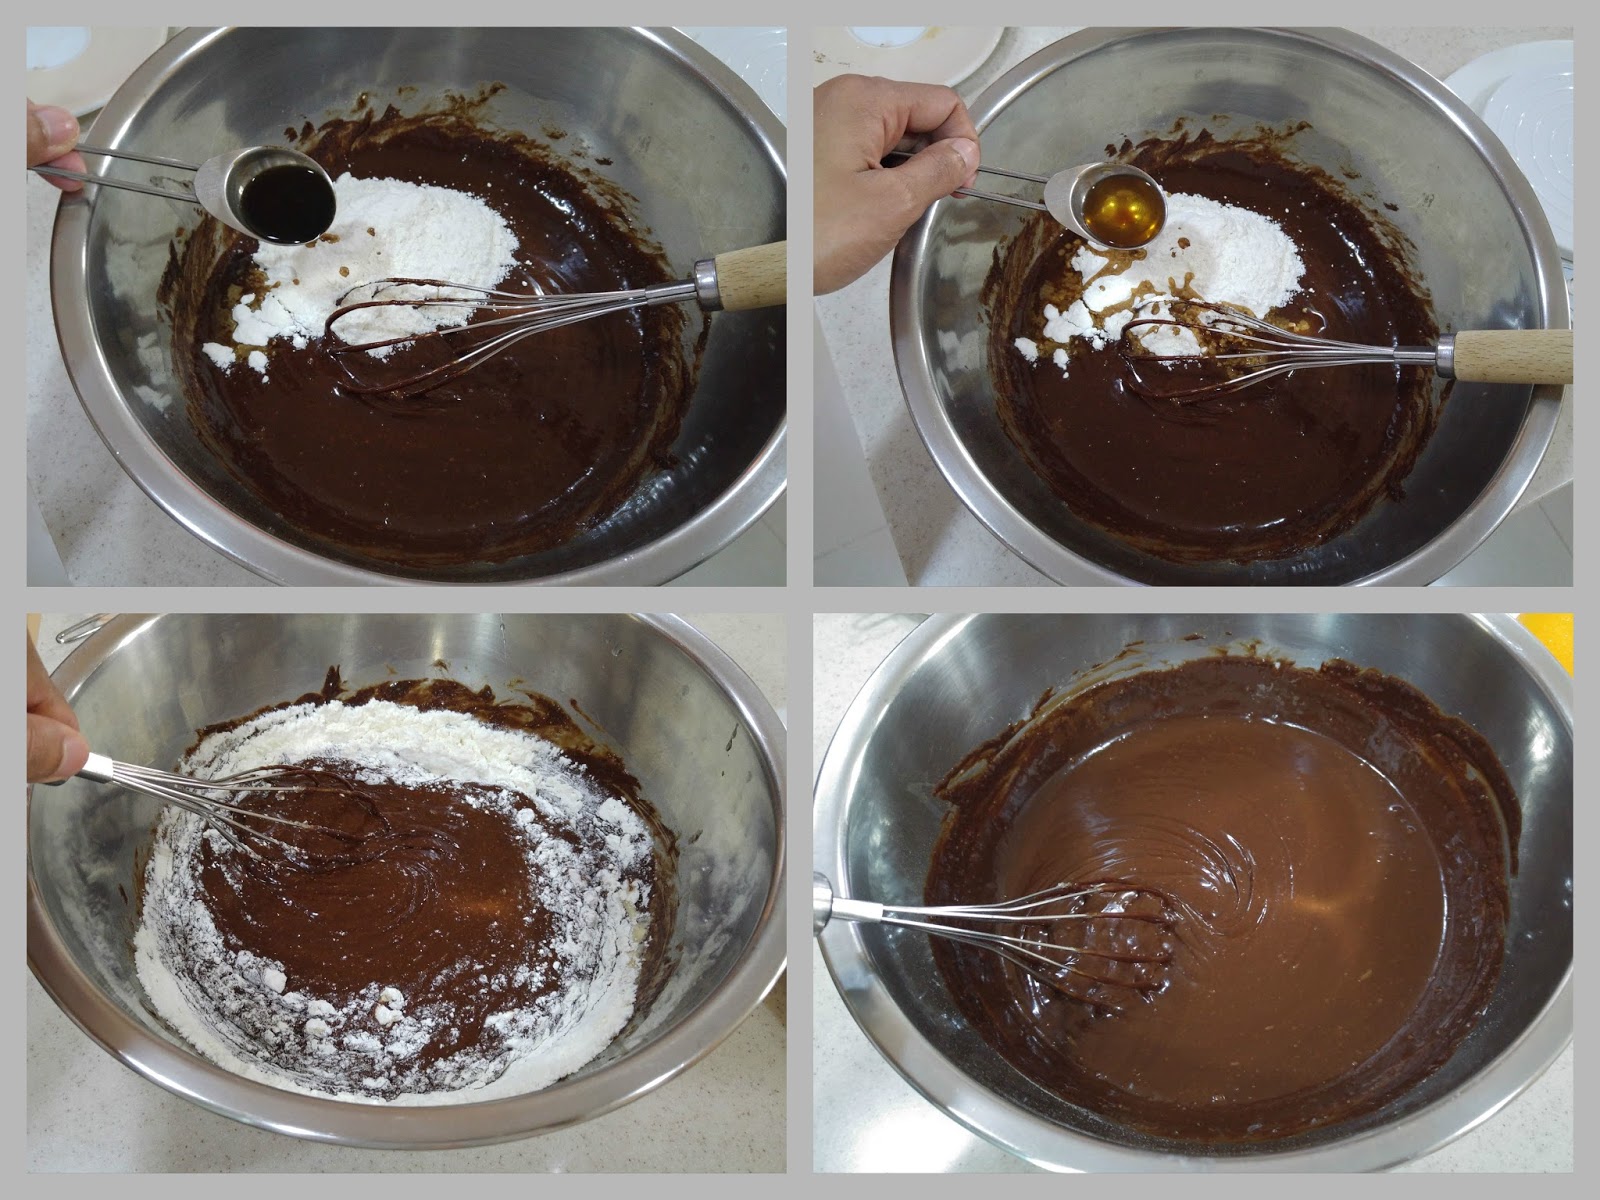
4. Add the flour, vanilla extract, bourbon and stir to combine into a batter.
5. Add the zest and stir gently.
7. Spoon and divide chocolate batter into prepared tins.
8. And bake for 8-10 minutes, 12 minutes for extra soft brownie texture.
9. When done, remove from the oven, cool on a wire rack for 3 minutes.
10. Invert the chocolate lava into restaurant style dessert; Place exactly amount of vanilla custard sauce into serving plates. Spread the sauce with the spoon to the desired shape. Clean up the edges of the sauce or any drips on the plate with clean dry rag or paper towel.
11. Using a knife, loosen cakes from sides of tins. Place the chocolate lava into the center of the cream vanilla sauce, garnished with strawberry, sprinkle some pistachios nuts.
13. Serve immediately, I made it!

Tuesday, April 2, 2013

Orange Soufflé Served With Crème Anglais

Since its Easter Sunday or Domingo de Pascua, I thought it would be a fun and perfect recipe for the sweet treats is to cracked some eggs in the kitchen. I decided that I’d make a soufflés for Easter Sunday lunch. I'm gonna be honest it is my first time to make this luscious soft and airy dessert. I am so wary of attempting soufflés, which have the reputation of being difficult and temperamental it required techniques. I remember I pay for this souffle💰in expensive french restaurant in Taipei. And I'm so glad I did, I proved to myself that I could do it and say yes I can cooked French! Wasn't  difficult! The reality is that they are relatively easy to make is like your making a Salzburger nockerl. While I am peeking in the glass window of the oven. I’m pleased as they rose up perfectly, I was so excited. This souffle recipe is so easy, If I can do it so you can, just involves dedication on cooking.
Ingredients:
2 oranges, juice and zest
3 tbsp cognac
2 organic egg yolks
4 organic egg whites
3 tsp corn flour
1 tbsp plain flour
100ml whip cream 
100ml whole milk
6 tbsp caster sugar
pinch of salt
melted butter for greasing
refine white sugar
icing sugar for dusting
cream vanilla sauce
Preparation:
1. Take 4 ramekins and brush them completely with softened butter. Sprinkle some refine granulated sugar to each ramekins and turn them to coat the sides and bottom. So the soufflé doesn't stick to the dish. Shaking out any excess, set aside to chill in the fridge.
2. Put the cream, salt, plain flour and cornflour into a  saucepan and whisk to a smooth paste.

 3. Heat the milk in the microwave, but do not let it boil just steam. If you don't like using the microwave, just heat it up on the stove. Warm the milk in a saucepan over a medium heat until just boiling, remove from the heat. Mix the hot milk into the cream flour mixture with the wooden spoon, spatula or balloon whisk. Add a little a time and mix well until the mixture is smooth like really thick cream. Press if any lumps to the side, then add and strain the orange juice, orange extract and cognac then whisk.

4.  Add the egg yolks whisking occasionally. Put the saucepan back on the stove to thicken again. Whisking constantly to a velvety texture. Transfer the custard mixture into a mixing bowl if you prefer. Let it cool into a body temperature. While cooling the custard mixture, preheat oven into 180°C.
5. When the custard mixture in the mixing bowl has cooled. It's time to whip or beat the egg whites. Place the egg whites in a large bowl using a hand whisk or electric mixer. Whisk and add the sugar as you are mixing, one spoonful at the time.
6. Keep whisking to give stiff, firm peaks to give volume to the meringue.
7. Add one large spoonful of the egg whites and mix well with the whisk or spatula to make the mixture less stiff. Add the orange zest and carefully fold in the remaining egg whites until well mixed.
8. Carefully spoon the mixture into prepared ramekins.
9. Run a thumb nail around the inside of the ramekins, this will help them to rise evenly.
10. Place the ramekins on the baking tray in the middle of the oven for about 15-20 minutes until risen and turning golden Don’t open the oven during cooking just watched them through the glass until they were done (The soufflés should be evenly risen and soft-pillowy inside..)
11. Take them out from the oven as soon as they’ve risen. Be careful, the ramekins are very hot. Dust with icing sugar and serve immediately with cream vanilla sauce.
12. I loved to  make a small slit in the middle of soufflé and fill it with cream vanilla sauce.

Saturday, March 30, 2013

Suman Verde Served With Latik

These sweet steamed sticky rice wrapped in banana leaves will be a hit with anyone who enjoys that wonderful suman that come with Pinoy merienda (snack) or desserts. Suman is usually made with lye water a kind of edible chemical subtance that adding extra flavor. But for my makeover suman, I like the using fine white sugar gives this dish and try adding a pandan extract which will give it a green color like fine jade. They also feature a nutty flavor of coconut condensed and flaked toasted coconut or latik on the outside. My family just loves this wonderful and easy steamed rice dumpling that's as truly delicious.
Ingredients:
3 cups glutinous rice or malagkit
2 cups white granulated sugar
1 tbsp condensed coconut
½ tsp pandan extract
pinch of salt to brings out the flavor
5x6 inch banana leaves
10x10 inch banana leaves
latik
Preparation:
1. Place the malagkit or sticky rice in a mixing bowl then pour in water and stir and allow to sit for at least 2-3 hours. In the meantime, prepare the banana leaves. Warm the whole banana leaf or cut into manageable pieces, large and small enough to wrap the rice dumplings, then clean with a soft cloth. Wash and rinse the rice, line colander with thin soy bean cloth or cheese cloth and let the rice drain out the excess water.
2. Put the sticky or glutinous rice back in the mixing bowl and combine with sugar, salt, pandan and condensed coconut.
3. Mix well until all the grains have an even color.
4. Arrange the banana leaves by placing the larger leaf then put the smaller leaf in the center. Spoon around 3 tbsp rice mixture into the center of the leaves. lengthwise, the shape of a log.
5. Roll them up and fold that side to enclose the rice.
6. Make another one the same size around 5 or 6 inches. Pair these 2 suman with the folded sides together, then tie the two ends together tightly.
7. In a copper casserole pot or heavy pot. Place the parcels or wrapped rice mixture, add enough water to cover the suman. Cover and boil at medium heat for 1 or 1½ hours until it is cooked completely. The simmering time depends on the type of your pot.
8. When its boiled, the banana leaf imparts a lovely aroma to the suman.
9. Transfer the suman on a colander to drain the excess water.
10. Take the suman, cut the string and unwrap then discard the banana leaves. Serve hot or cold, but still far from perfection, of course best eaten while still hot, serve with  latik or toasted coconut. Add more sugar on top of the suman if you want. Enjoy them with a smile!
Note:
Suman may be kept in the refrigerator for up to 2 weeks.  They also survive the freezing process for couple of months. The quantity of these ingredients it yield 16 or 18 suman.

Saturday, March 9, 2013

Ginataang Mais With Macapuno

My version of ginataang mais with macapuno. Ginataang mais is a Filipino rice and corn sweet dessert or rice pudding and it really brings back a lot of memories of my grandmother Anastacia. There is one ingredient that not really a very traditional Filipino ginataang mais. I found out that the black rice it has a nutty flavor which makes this ginataan extra enjoyable to eat. Black rice is a type of whole grain glutinous rice usually eaten in Thailand. If you can't find black rice, just white glutinous rice that would be great. You can use corn kernel in a can but fresh is always best. This dish is that it can be served warm or cold, after meal or just a snack that every Filipino loves!
Ingredients:
4pcs fresh corn kernels
½ cup black sticky rice
1 ½ cup glutinous rice or malagkit
8-10 cups coconut milk
1 ½ cup granulated white sugar
2 tbsp vanilla extract
1 cup macapuno
a dash of salt
coconut cream
Preparation:
1. Put the black rice in a deep bowl and pour in cold water and soak for overnight. Drain the rice, wash and rinse through your fingers to clean it then drain. Repeat until the water comes clean.
2. Remove the fibers and outer skin, rinse and use a sharp knife to shred the corn from the cobs. Set aside.
3. In a copper pot or any heavy pot, mix all ingredients except for corn and cream, cover and heat until boiling.
out 20 minutes or until the rice and corn are cooked. By the way don't cooked too much, the rice it should be cook in al dente and not too soft it should be close to risotto.
5. Add the macapuno or fresh grated buco strips even better. Stir every now and then to prevent it from sticking to the pot., uncovered and cooked and boil for another 10 minutes. Add more water if necessary.
6. Add around 1 cup of coconut cream.
7. When the coconut cream has been absorbed, remove from the heat.
8. Serve hot or cold and drizzled some coconut cream on top if desired.

Saturday, December 22, 2012

Apple Apricot & Peach Crumble

This apple apricot and peach crumble and absolutely delicious served with vanilla ice cream.  It tastes even better  while still hot! This recipe it's super easy to make.  Any leftovers can be refrigerated for up to 2 days.
Ingredients:
3 pcs. red apples
3 pcs. peaches4 pcs black velvet apricots
50g pecans
1 lemon zest and juice
½ cup light sugar
1 tsp cinnamon powder
Crumble Topping
1½ cups self rising flour
1 cup wheat germ
½ cup softened butter
½ cup muscovado sugar or you can over power the sweetness of this dessert.
4 tbsp milk
1 tbsp vanilla extract
Preparation:
1. Heat oven at 180°C, butter a square baking dish. Meanwhile, skin peeled the apples and cut into quarters. Then peeled and cored the peaches and apricots or leave the skin on and cut into quarters.
2. Put the sliced fruits, pecans, cinnamon, lemon zest and juice in a large mixing bowl, mixing all together.
3. Transfer the fruits mixture in a prepared baking dish.
4. To make the crumble topping, put the topping ingredients into a mixing bowl.
5. Then rub with your fingertips until the mixture resembles fine breadcrumbs.
6. Spread the crumble all over fruits.
7. Bake in the preheated oven for 40-45 minutes or until the apples are soft and bubbling, and the crumble topping is golden brown and crisp.
8. Pop a scoop of good vanilla ice cream.
9. Place on top of the fruits crumble on each plate and drizzle some caramel sauce if desired.